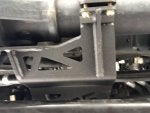
Installed the PMF Dual Stabilizer kit on my F250 Saturday afternoon. Start to finish was about 1 hour. Install was pretty simple once you figure everything out. The instructions (attached) were decent, but not real detailed, so I'll add my thoughts on the install below. All of the hardware is either powder coated or plated (Zinc?)... everything fit perfectly and all went together very nicely:
Tools needed:
3/8 drive ratchet
3/4" socket and open end wrench
9/16" socket and open end wrench
Blue Loctite (optional)
Small bubble level
Torque wrench (I used my 3/8 snap-on)
I installed all of the mounting bolts with the nuts facing up and had no clearance issues.
The 3/8" bolts for the diff cover do not require washers.
The clamp holding the main brace to the axle and diff cover looks like it won't fit with the bolts supplied (too short)... it will. Get one bolt started on the top, another on the bottom and start pulling it in. Bolts will be long enough. (uses 4 bolts, 4 nuts, 8 washers).
Of the remaining 4 bolts, the two shorter ones mount the dampers to the brace and dog bone (uses 2 bolts, 4 washers and 2 nuts).
The longest of all the bolts mount the shaft end of the dampers to the outer-most brackets (uses 2 bolts, 4 washers and 2 nuts).
For the diff and axle bracket, slide it in from the driver's side. install the two axle cover bolts first (loctite) but do not tighten. Install the axle brace next using the 4 bolts, 8 washers and 4 nuts. Once this is all installed, tighten them down (20 ftlbs on the diff cover bolts. I did good-n-tight on the bracket bolts).
Install the canister end of the dampers into the bracket using the 2 shorter bolts, 4 washers and 2 nuts along with the dog bone. DO NOT TIGHTEN!!!
Install the outer brackets on the link. The brackets should 'curve' inward, giving you 19 1/4" distance from eyelet to eyelet on the damper (Bilstein and Fox). I found that there is a 'ledge' on the link that the bracket fits up against that works perfectly for that distance. Install the bracket and verify that the bracket is level (use your bubble level). Once level, tighten to 16 ftlbs. Repeat for the other side.
Compress the damper and insert the longest bolt (bolt, 2 washers, 1 nut) through the bracket and into the shaft end of the damper. Torque to 65 ftlbs. Repeat for the other side.
Torque the center damper bolts to 65 ftlbs.
Verify there are no clearance issues.
Again, I used blue loctite on all of the hardware, even though the nuts were all nylocks.
Also note, in my photos below, my F250 has an OEM steering damper... so now I have three
")
Much less steering movement when going over the craptastic potholes and expansion joints her in Colorado. I think it was well worth the $299 and wish I had done it sooner.