

Poor Man’s 7.3 Buzz test
Since the only diagnostic equipment I have is the code scanner in a Superchips tuner, I had to find a way to diagnose my injectors since one was misfiring, and do not know anyone with fancy diagnostic tools. This isn’t some tried-and-true procedure, but it will give you some idea where the problem lies before you start ripping off valve covers.
Tools required:
Socket set
12 DC power souce (battery charger, cordless drill battery etc.)
misc test leads
Procedure:
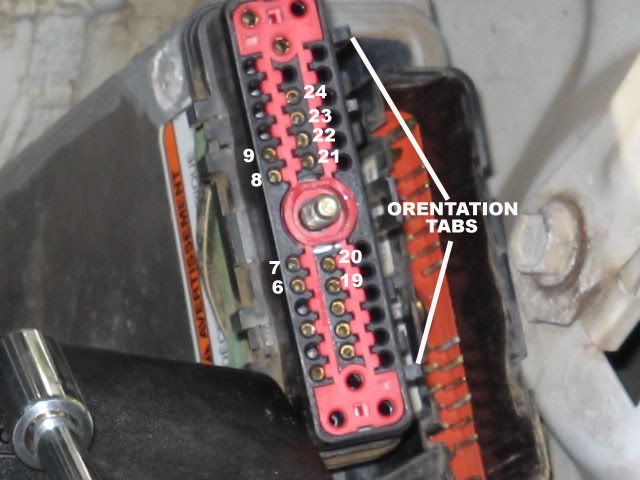
Disconnect IDM connector from IDM, unbolt IDM if necessary.
![Image]()
pin
6 Injector #1
7 Injector #4
8 Injector #5
9 Injector #8
19 Injector #6
20 Injector #7
21 Injector #3
22 Injector #2
23 Common for injectors 2, 4, 6, 8
24 Common for injectors 1, 3, 5, 7
Testing:
Connect one side of power source to pin 24 (common for 1,3,5,7.) Touch other side of power source MOMENTARILY to pin 6 to test injector #1. A distinctive <click> should be heard when power applied and removed. If not, there is either an issue with wiring, or the solenoid. If there is no click, but a small spark indicating current draw, there is an issue with the armature plate or poppet. Repeat test for injectors 3, 5, and 7 using pins as listed above. To test the driver’s side bank, connect one source lead to pin 23, and touch the other to the applicable pins for injectors 2, 4, 6, and 8. I recommend using an external power source rather than the truck’s battery, so if the incorrect pin is probed, no short circuit will occur, damaging wiring or the PCM..
Oh yeah, my misfiring was caused by an armature screw I over-torqued doing the DIY Stage 2’s, and it eventually snapped.
Since the only diagnostic equipment I have is the code scanner in a Superchips tuner, I had to find a way to diagnose my injectors since one was misfiring, and do not know anyone with fancy diagnostic tools. This isn’t some tried-and-true procedure, but it will give you some idea where the problem lies before you start ripping off valve covers.
Tools required:
Socket set
12 DC power souce (battery charger, cordless drill battery etc.)
misc test leads
Procedure:
Disconnect IDM connector from IDM, unbolt IDM if necessary.
pin
6 Injector #1
7 Injector #4
8 Injector #5
9 Injector #8
19 Injector #6
20 Injector #7
21 Injector #3
22 Injector #2
23 Common for injectors 2, 4, 6, 8
24 Common for injectors 1, 3, 5, 7
Testing:
Connect one side of power source to pin 24 (common for 1,3,5,7.) Touch other side of power source MOMENTARILY to pin 6 to test injector #1. A distinctive <click> should be heard when power applied and removed. If not, there is either an issue with wiring, or the solenoid. If there is no click, but a small spark indicating current draw, there is an issue with the armature plate or poppet. Repeat test for injectors 3, 5, and 7 using pins as listed above. To test the driver’s side bank, connect one source lead to pin 23, and touch the other to the applicable pins for injectors 2, 4, 6, and 8. I recommend using an external power source rather than the truck’s battery, so if the incorrect pin is probed, no short circuit will occur, damaging wiring or the PCM..
Oh yeah, my misfiring was caused by an armature screw I over-torqued doing the DIY Stage 2’s, and it eventually snapped.


