
Took the truck down to shop on Saturday afternoon. First thing I did was grabbed a pop and sandwich and put the mp3 player on, got some tools together and the kit set out. Also, most is by memory and pics to remind me of process, it took me parts of 3 days to complete (ran into issues, youll here about them later :hehe")
![Image]()
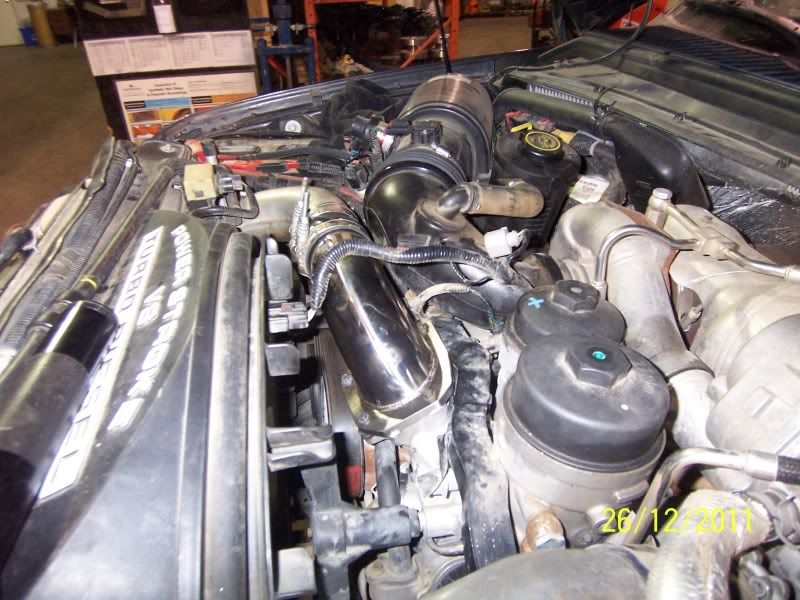
A couple shots of engine before commencing...
![Image]()
![Image]()
![Image]()
Next I grabbed a couple foot of hose,layed under front of truck and loosened the plastic rad drain (there is a plastic nipple on side but coolant comes out from bolt too :doh I filled up a 5gallon bucket.
No pic.
Disconnect both batteries (just the neg on pass side), remove hold down bolt and remove driver battery. Disconnect coolant lines from degas bottle.
Remove 4 bolts that hold down battery tray/degas bottle (13mm bolts).
Wiggle and lift tray/degas up a bit, there is a vacuum line the clips in on backside of tray, and plugs in on fender side of tray at bottom.
![Image]()
(you can see two nipples on the tray there, the darker left one is where the vacuum line slides on)
![Image]()
![Image]()
Remove the bottom coolant hose from degas bottle, I used a pick to remove the clip.
Then pull out the clip on rad hose and simply pull out.
![Image]()
Disconnect rubber coolant hose from top egr cooler, remove two bolts at top of cooler (8mm and 13mm).
Loosen egr cooler clamps, there is three of them (11mm, deep socket or wrench)
Disconnect the second coolant house on top backside of cooler.
Loosen boost tube clamp(s), and break free. Unplug all sensors/harness at egr and intake, also one that goes towards the rad shroud.
Now at bottom of verticle cooler is the kinked metal exhaust tube that connects the two coolers, you need to cut it-with whatever means you have! Only thing I had (that would fit) were hacksaw blades.
![Image]()
![Image]()
Its pretty thin so it didnt take long to cut through.
Disconnect the bottom coolant line.
Remove the cooler from top (obviously), it comes out pretty easily.
![Image]()
![Image]()
![Image]()
(Now I suppose you could go ahead and remove the vertical cooler bracket now, I did it later...might be easier with more gone by then)
Jack up driver side, remove tire. Remove inner wheel well. Be sure your steering wheel is center. Disconnect the steering shaft, its a 13mm. Remove the oil dipstick hold down bolt (13mm- I believe?)
I used a couple bungee straps to hold the shaft up, and trans lines/wiring to give me more arm/hands room.
Now this is where I ran into troubles.......
![Image]()
These two bolts (10mm) stripped real easy on me, I had box end of wrench on em too...
![Image]()
Rounded.....:doh:
Now being xmas weekend I had no means of buying special tools and whatnot so I used some hard earned time and elbow grease to FINALLY get them out...The top bolt I managed to get a hacksaw blade between the flanges, cut the bolt cut half way then was able to vice grip it out.
I had mini pipewrench I ground off the head on, mini/large vice grips, smaller wrenches, 12pt/6pt sockets yadda yadda...
The bottom bolt I used a die grinder and ground off the head.
Loosen both (2) clamps securing cooler, I took a trusty hacksaw blade and cut the rubber coolant line at back/bottom...
![Image]()
![Image]()
I then twisted the cooler and pulled towards front as much as I could and removed both the rubber lines completely from the cooler. I then wiggled, twisted, pulled. jimmied, yanked, etc that badboy UP and OUT.
There is a steel coolant line coming from front of motor that hooks in on that rubber hose I cut with blade, you want to remove the bolt (8mm) and remove that line, then install the plug provided in kit and reuse bolt.
I then removed the 4 bolts (10mm) from the cooler bracket- two of which were fairly easy, the other two is pretty much by feel, they are under bracket and tucked up kind of.. replaced the 4 bolts with new (shorter) ones provided.
Now since I buggered up those bolts I had to find a couple bolts/nuts to install the block off plate....simple.
Loosen clamps at cac/intake, remove 4 bolts (8mm) on intake and remove.
![Image]()
![Image]()
![Image]()
Mmmmmm, nasty...
I put a rag over intake so I wouldnt drop any tools down there!
I then went to remove vertical cooler bracket, theres one bolt at top, one at bottom which is kind of inboard-gotta go by feel. There is two more right beside each other on front behind the big loom running from one side of engine bay to the other. Then you need a 13mm and remove the outer bolt that holds down steel line (this is right by the two side-by-side bolts) which is right behind big loom. Pull the bracket out and remove the stud...now you can remove cooler bracket. Re-install that stud and put the steel line bracket back on. Wish I got pics of these...
You'll remember that steel line that went to top of vertical cooler just to the right of intake opening, you need to remove (again 8mm and keep it for reuse) it by feel, then install plug provided reusing bolt. This was alot easier with that cooler bracket out btw.
Installed the new intake elbow, using two bolts provided and reusing two short ones from the egr intake we removed earlier. Tighten up, tighten clamps/cac tube...
Re-install steering shaft with some loc-tite, oil dipstick tube. Boost tube clamps tighten.
Installed battery tray/degas bottle, hooking in vacuum line from underneath. Button up bottom coolant line, remove the "T" from small line and connect to degas. Install rad hose.
Re-fill with coolant until at level, I fired her up and installed inner wheel well and tire while watching the coolant level.
![Image]()
![Image]()
![Image]()
![Image]()
![Image]()
![Image]()
Oh, and this whole time I had that ********** song from big bag theory stuck in my head----:banging:
Cleaned up my mess,tools etc and made my way back home.
Anyways, overall it was harder then I expected but mainly because the grief I had with those two bolts, there are some pretty tight areas and the arms/hands get dinged up a bit but if you give yourself no deadline and are capable of troubleshooting I think most can do this.......That being said, first thing Id do is check those two bolts, once you cut the other parts there is no re-installing. Just a heads up.
:woot:

A couple shots of engine before commencing...


Next I grabbed a couple foot of hose,layed under front of truck and loosened the plastic rad drain (there is a plastic nipple on side but coolant comes out from bolt too :doh
I filled up a 5gallon bucket.No pic.
Disconnect both batteries (just the neg on pass side), remove hold down bolt and remove driver battery. Disconnect coolant lines from degas bottle.
Remove 4 bolts that hold down battery tray/degas bottle (13mm bolts).
Wiggle and lift tray/degas up a bit, there is a vacuum line the clips in on backside of tray, and plugs in on fender side of tray at bottom.

(you can see two nipples on the tray there, the darker left one is where the vacuum line slides on)


Remove the bottom coolant hose from degas bottle, I used a pick to remove the clip.
Then pull out the clip on rad hose and simply pull out.

Disconnect rubber coolant hose from top egr cooler, remove two bolts at top of cooler (8mm and 13mm).
Loosen egr cooler clamps, there is three of them (11mm, deep socket or wrench)
Disconnect the second coolant house on top backside of cooler.
Loosen boost tube clamp(s), and break free. Unplug all sensors/harness at egr and intake, also one that goes towards the rad shroud.
Now at bottom of verticle cooler is the kinked metal exhaust tube that connects the two coolers, you need to cut it-with whatever means you have! Only thing I had (that would fit) were hacksaw blades.


Its pretty thin so it didnt take long to cut through.
Disconnect the bottom coolant line.
Remove the cooler from top (obviously), it comes out pretty easily.


(Now I suppose you could go ahead and remove the vertical cooler bracket now, I did it later...might be easier with more gone by then)
Jack up driver side, remove tire. Remove inner wheel well. Be sure your steering wheel is center. Disconnect the steering shaft, its a 13mm. Remove the oil dipstick hold down bolt (13mm- I believe?)
I used a couple bungee straps to hold the shaft up, and trans lines/wiring to give me more arm/hands room.
Now this is where I ran into troubles.......

These two bolts (10mm) stripped real easy on me, I had box end of wrench on em too...

Rounded.....:doh:
Now being xmas weekend I had no means of buying special tools and whatnot so I used some hard earned time and elbow grease to FINALLY get them out...The top bolt I managed to get a hacksaw blade between the flanges, cut the bolt cut half way then was able to vice grip it out.
I had mini pipewrench I ground off the head on, mini/large vice grips, smaller wrenches, 12pt/6pt sockets yadda yadda...
The bottom bolt I used a die grinder and ground off the head.
Loosen both (2) clamps securing cooler, I took a trusty hacksaw blade and cut the rubber coolant line at back/bottom...


I then twisted the cooler and pulled towards front as much as I could and removed both the rubber lines completely from the cooler. I then wiggled, twisted, pulled. jimmied, yanked, etc that badboy UP and OUT.
There is a steel coolant line coming from front of motor that hooks in on that rubber hose I cut with blade, you want to remove the bolt (8mm) and remove that line, then install the plug provided in kit and reuse bolt.
I then removed the 4 bolts (10mm) from the cooler bracket- two of which were fairly easy, the other two is pretty much by feel, they are under bracket and tucked up kind of.. replaced the 4 bolts with new (shorter) ones provided.
Now since I buggered up those bolts I had to find a couple bolts/nuts to install the block off plate....simple.
Loosen clamps at cac/intake, remove 4 bolts (8mm) on intake and remove.


Mmmmmm, nasty...
I put a rag over intake so I wouldnt drop any tools down there!
I then went to remove vertical cooler bracket, theres one bolt at top, one at bottom which is kind of inboard-gotta go by feel. There is two more right beside each other on front behind the big loom running from one side of engine bay to the other. Then you need a 13mm and remove the outer bolt that holds down steel line (this is right by the two side-by-side bolts) which is right behind big loom. Pull the bracket out and remove the stud...now you can remove cooler bracket. Re-install that stud and put the steel line bracket back on. Wish I got pics of these...
You'll remember that steel line that went to top of vertical cooler just to the right of intake opening, you need to remove (again 8mm and keep it for reuse) it by feel, then install plug provided reusing bolt. This was alot easier with that cooler bracket out btw.
Installed the new intake elbow, using two bolts provided and reusing two short ones from the egr intake we removed earlier. Tighten up, tighten clamps/cac tube...
Re-install steering shaft with some loc-tite, oil dipstick tube. Boost tube clamps tighten.
Installed battery tray/degas bottle, hooking in vacuum line from underneath. Button up bottom coolant line, remove the "T" from small line and connect to degas. Install rad hose.
Re-fill with coolant until at level, I fired her up and installed inner wheel well and tire while watching the coolant level.


Oh, and this whole time I had that ********** song from big bag theory stuck in my head----:banging:
Cleaned up my mess,tools etc and made my way back home.
Anyways, overall it was harder then I expected but mainly because the grief I had with those two bolts, there are some pretty tight areas and the arms/hands get dinged up a bit but if you give yourself no deadline and are capable of troubleshooting I think most can do this.......That being said, first thing Id do is check those two bolts, once you cut the other parts there is no re-installing. Just a heads up.
:woot:


